How to Clean Your Bathroom Exhaust Fan Easily
Does your bathroom feel a bit more humid than usual after showers? Is there any dust buildup or strange sound coming from the ceiling fan? Have you ever considered how much dirt is hiding inside your exhaust fan? If there’s no cleaning or if one doesn’t remember having it cleaned at any point in time, it’s safe to assume it is overdue for a cleaning. Wind-bearing bathroom fans do a good job of getting rid of moisture, odours, and airborne particles-but with dust and debris clogging them up, they are rendered useless even in an instant.
Ignoring a bathroom fan might cause issues with the circulation of air, with mold growing, and also with several other things. Don’t worry, cleansing your fan does not need much time, special equipment, or advanced skill. Restoring the function of the fan is simple and effortless. In this blog, we will explain an easy approach using a stepwise technique to deep clean your fan without causing additional stress.
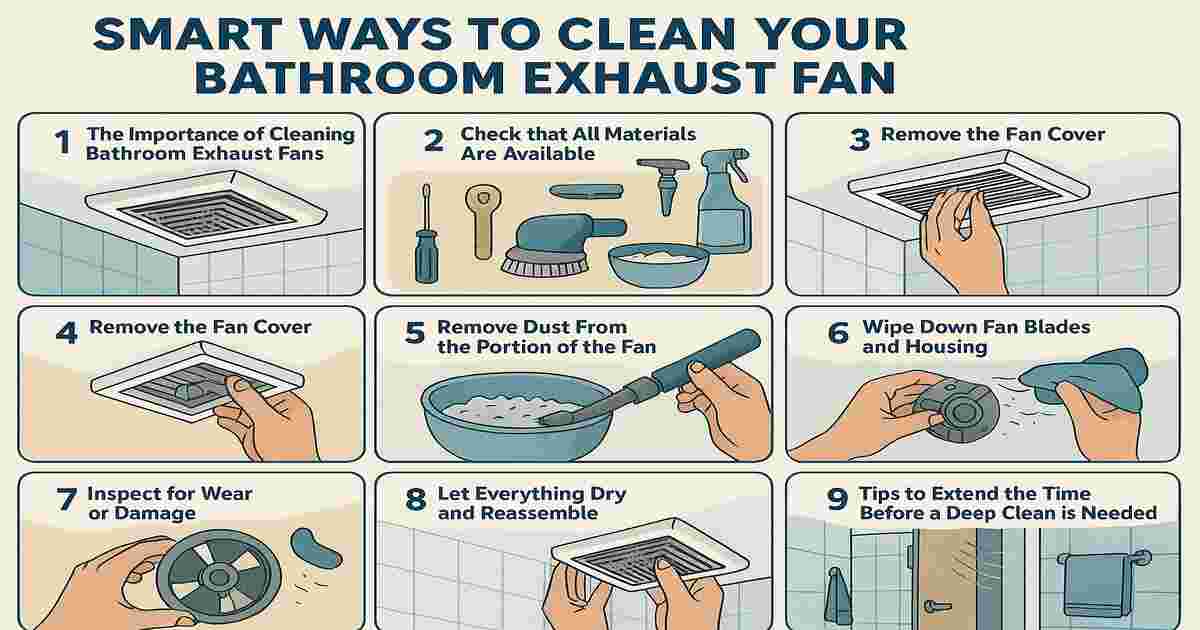
1. The Importance of Cleaning Bathroom Exhaust Fans
Have you asked yourself why it’s important to clean out your bathroom exhaust fan? As with other house machines, the job of your bathroom fan is to eliminate moisture from the air, to prevent humidity, mildew and mold growth in your bathroom, as per bond clean Brisbane. The efficiency of the exhaust fan you use becomes less effective when dust and grime also enter that specific area of equipment. It may become inefficient and put additional stress due to blockage. A filthy fan will also release dust-laden air back and could set off a fire in case of worst scenario.
Taking out dirt and debris from the fan allows better air circulation, saves your walls and ceiling from damage and uses less energy. If all goes well, a fan should be cleared every half a year; however, people who use the room a lot may want to do it more often.
2. Check that All Materials Are Available
The cleaning process is simple, however, it is best to have all equipment lined up before making the process efficient.
You will need the following:
– A step ladder or sturdy stool.
– Screwdriver (usually Phillips head).
– Vacuum with brush attachment.
– Microfiber cloths or rags.
– Mild detergent or all-purpose cleaner.
– Any small brush (e.g., an old toothbrush works).
– Compressed air can (optional but helpful).
– A bowl of warm soapy water.
Once all of the tools are collected, you can turn the circuit breaker off to ensure that the fan is off for safety reasons.
3. Remove The Fan Cover
With the fan cover removed, you can climb as high as the cover allows. In the bathroom, the fan cover also constitutes the grill that sits on top of the fan. Every fan is equipped with a hole so that they can screw in or unclasp them in their place. If the cover springs up, round for the tip of the cover, squeezing at the top should loosen the cover, enabling you to pull it down. On the other hand, if the cover is clamped or spring loaded, a screwdriver can easily be used to loosen and remove the cap.
The inspection stage has started now that the cover has been put aside. A good portion of dust and mildew should, in fact, be visible. This tells us how overdue the fan gets quieter by the minute while it is overdue for a timeline. You could use a vacuum to lift everything that has been stacked up.
4. Wash the Fan Cover with Care
While cleaning the fan cover, the first step should be to soak it in warm soapy water. The water can be stored in a basin or in a sink. Keep the cover submerged for 10 to 15 minutes, so the dust particles and grime become weakened. Once you take the cover out of the water, gently scrub it with a brush or even a cloth, especially places like air vents and corners that pose a bit more challenge. After you’ve rinsed it off, set it aside to dry before reattaching it to the fan.
If mildew appears, spread diluted white vinegar over the cover and let it soak until the signs disappear and the cover is disinfected.
5. Remove Dust From the Portion of the Fan That houses the Vacuum
Grime does not stand a chance once vinegar is put in the picture! Next up is the vacuuming of the brush or crevice that helps in getting rid of loose dust accumulated in the fan housing and motor area. Be sensitive while dealing with the motor. Motor wires and other intricate features need to be handled with care. For better long-term hygiene and prevention, professional services like bond cleaners in Brisbane can also be considered if the buildup is too stubborn.
Work slowly, cleaning every area accessible, fan blades and corners included as well.” A can of air can help rid stubborn pieces of lint stuck deep in hard to reach places, Hold can upright and blow loose debris piece after piece using short bursts.
6. Wipe Down Fan Blades and Housing
After the fan is vacuumed, dampen a microfiber cloth to wipe the blades, the case surrounding the motor and the inside of the fan.
If a bathroom has greasy areas from poor or broken heating or a dusty fan, you should use detergent when cleaning. When near electrical components, water usage becomes superfluous. So long as wiring is avoided, a dry or slightly damp cloth suffices.
7. Inspect for Wear or Damage
Fans that are used often tend to show signs of aging over time. When cleaning, it is best to check for superfluous spinning, wire damage or blade cracking. It is recommended to reach out to a certified electrician or purchase a new fan unit should any damage present itself. Addressing minor damages early on saves the risk of running into significant issues further down the line.
8. Let Everything Dry and Reassemble
To ensure no rusting forms, all components need to be fully dried post cleaning, the fan cover. Cover replacement is achieved by clip snapping or screw tightening, restoring power then is done by the circuit breaker afterwards.
Check that the fan is functioning properly by turning it on. You’ll notice a significant reduction in noise along with improved air flow. If the noise persists or air flow doesn’t improve, motor servicing or replacement might be necessary.
9. Tips to Extend the Time Before a Deep Clean is Needed
To minimise dirt buildup between cleaning, activate the fan during and at least 15-20 minutes after showers to remove excess moisture. During showers, keep the bathroom door ajar to promote better airflow into the bathroom.
Consider using microfiber cloths to dust fan covers monthly, just like when you clean faux leather couch like a pro. If the bathroom tends to retain moisture after use, aim to deep clean the fan every three to four months instead of six.
Final Thoughts: It’s Easy to Overlook
Cleaning exhaust fans is often not a regular chore, but that is about to change. Neglecting the bathroom exhaust fan can lead to many issues that some might overlook, such as air quality and mold. However, the benefits of having cleaner air in the bathroom, along with improved ventilation and reduced risk of fan damage, is worth the effort. It does not require much effort—just an hour and a few tools.
So, now that you have a list of cleaning tasks for various systems, don’t forget the exhaust fan in your bathroom. Giving it the care it deserves, along with maintaining the rest of the room, will save you energy bills in the long run and greatly benefit your lungs. If you have never done this before, now is the best time to do it.